Author Topic: Building another flintlock  (Read 88882 times)

0 Members and 1 Guest are viewing this topic.

Offline Eric Krewson

  • Member
  • Posts: 5,432
Re: Building another flintlock
« Reply #150 on: April 30, 2016, 06:11:47 pm »
Next I tackled the pins on the trigger guard, this is where things went really bad. After measuring carefully I drilled my holes and almost missed the lugs. I decided to do the whole process over, plugged the bad holes and redrilled, the back lug went good this time so I tapped a pin in the hole. The pin chipped out a big place on the off side, dang, time for a patch to fill the chip. The parts that chipped out were in tiny splinters and unrecoverable.

I chiseled out a small square, made a maple plug to fit it and pounded the plug tightly into the mortise with plenty of wood glue. These tend to be pretty hard to find after the rifle is finished but I still hate I had to make a patch.


Now things went really, really bad; I drilled for the front lug and came out way low on the off side. I plugged the hole and redrilled , everything looked good. When I tapped in a pin it came out the plugged hole, not good. I plugged the hole again and ran a drill bit through the lug and hole to line things up. The dang drill bit broke off in the lug.

 The only way to get it out was to put a punch in from the opposite side. A couple of taps and the piece of broken pit popped out the other side. When the broken bit came out it took a splintered 3/4" section of my lock mortise with it. What a mess! 

Fortunately all the splintered parts were still attached at the ends and fit back perfectly where they came from. Some glue and a tight string put the parts back into place. The curly maple stock blank I am using is the more prone to splintering than any wood I have used so far.


After I got everything glued into place I put up my tools and cut the lights out in my shop, tomorrow I will straighten out my goof-ups and move forward.

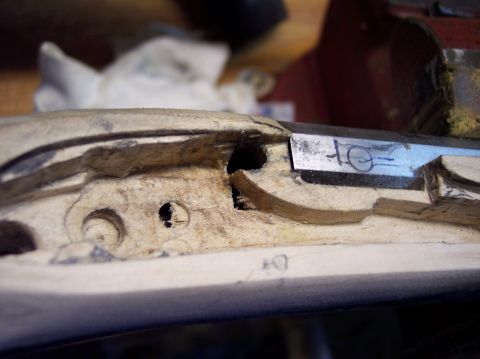
I unwrapped the badly cracked area this morning. The fix came out really well. The circle is the pin hole filled up with glue.
« Last Edit: May 01, 2016, 08:46:59 am by Eric Krewson »

Offline PaulN/KS

  • Member
  • Posts: 1,388
Re: Building another flintlock
« Reply #151 on: April 30, 2016, 07:55:28 pm »
Eric,
There are times when the stars are not aligned and it sounds like this was one of those days for you.
That curly maple can be a pain to work with sometimes too. It looks nice but a "pain"...

Offline Eric Krewson

  • Member
  • Posts: 5,432
Re: Building another flintlock
« Reply #152 on: May 01, 2016, 01:09:50 pm »
I found if I tried to a put a pin in from the left side it came out the plugged hole, from the right it went where where it was supposed to go. Anyway, a pin tapped in from the right worked perfectly (I had to plug the low hole one more time). The area around the pin was a broken mass of splinters, it went back together nicely.


Offline JW_Halverson

  • Member
  • Posts: 11,923
Re: Building another flintlock
« Reply #153 on: May 01, 2016, 01:15:58 pm »
Curly maple can make you so mad your cussing will curl someone's hair, and if they have curly hair already, it will blister it off!   >:(

Doesn't stop you from choosing it over and over again, though!   >:D
Guns have triggers. Bicycles have wheels. Trees and bows have wooden limbs.

Offline Eric Krewson

  • Member
  • Posts: 5,432
Re: Building another flintlock
« Reply #154 on: May 03, 2016, 12:27:38 pm »
Looking back; I think my problems came from using a random bit. I always use a new bit for drilling these types of holes. I bought two new bits but they got mixed up with the rest of my bit collection and I suspect I drilled with a dull bit.

These are pretty small holes, I use a #47 bit which is .0765,the pin is .0770.

Offline Eric Krewson

  • Member
  • Posts: 5,432
Re: Building another flintlock
« Reply #155 on: May 08, 2016, 06:55:16 pm »
Toe plate time, pretty easy compared to the other stuff. I did have a few bumps in the road. Somehow I got my inlet for the front part a little too wide so I peened the metal a little to expand it and make it fit my oversized inlet.

Starting out;


First fit, holes countersunk, front end peened to make it a little bigger;


In, tight fit, sanded and filed to match the buttplate and stock profile.


Offline Eric Krewson

  • Member
  • Posts: 5,432
Re: Building another flintlock
« Reply #156 on: May 12, 2016, 08:23:44 pm »
Time for the muzzle cap; first I have to bring the extra wood on the forestock along side the barrel down to half the barrel side flat. I make a line on the barrel to work to (I didn't like the line in the picture and redrew it). 


I rasp and finish sand the side rails down to my line, I want them even with no dips;


Next I measure the distance the muzzle cap needs to fit properly;


Cut a little excess wood off;


Fit the muzzle cap to the barrel, it needs adjustment to make it wider;


Good enough;


More to follow later.


Offline Mounter

  • Member
  • Posts: 198
Re: Building another flintlock
« Reply #157 on: May 12, 2016, 11:57:57 pm »
Great build along! I'm loving it.

Offline Eric Krewson

  • Member
  • Posts: 5,432
Re: Building another flintlock
« Reply #158 on: May 16, 2016, 08:00:29 pm »
I was about to order a sideplate and thought "why not make one", here goes;

I drew a design first;


Glued the pattern to my strip of metal and sawed off as much excess metal as I could;


Saw, bench grinder and a finish up with a file to shape the plate;


Drilling for the lock bolt;


My initial design was much too big so I shortened the bottom of the plate for a better fit to the side panel, I may take off more later. The plate will look much better after I inlet it and finish the metal.


Offline Eric Krewson

  • Member
  • Posts: 5,432
Re: Building another flintlock
« Reply #159 on: May 17, 2016, 08:30:06 pm »
Back to the muzzle cap;

I took of off a bunch of wood and have been test fitting the nose cap, a little black to remove;


Getting close;


The basic inlet is done but I have to move the cap back about 1/8" to bottom out on the wood at the front of the barrel.


Offline Eric Krewson

  • Member
  • Posts: 5,432
Re: Building another flintlock
« Reply #160 on: May 18, 2016, 07:47:22 pm »
I have the muzzle cap back where I want it;


I am going to fasten it with an 8-32 screw and make the screw look like a rivet.


I drilled for the screw, of course something shifted during the process and I am a little off center.


I tapped the hole for an 8-32 thread ,counter sunk the wood for the screw head and installed the screw. I coated the area with Zap A gap superglue to harden the wood where the screw goes through.


Blurry pic;


I used a jeweler's saw to cut the excess screw off. I can get really close to the cap with it because it has such a fine blade;


Filed the screw flush with cap and called it done. I had to file the inside of the cap a little to get the barrel to drop in and out easily. I will sand all the metal on the gun to 320 grit before I grey the parts. The picture makes everything look lopsided but all is even.


Offline Eric Krewson

  • Member
  • Posts: 5,432
Re: Building another flintlock
« Reply #161 on: May 21, 2016, 05:53:01 pm »
Fun day in the shop today fixing bows, starting bows and working on my flintlock.

I had some glue curing on another project so I inletted the sideplate on my flintlock.


Done and filed most of the way down to the wood. I leave the plate just a little proud so I can reduce it to the wood level when I do the final sanding of the stock.

« Last Edit: May 21, 2016, 06:34:39 pm by Eric Krewson »

Offline Eric Krewson

  • Member
  • Posts: 5,432
Re: Building another flintlock
« Reply #162 on: May 22, 2016, 06:17:35 pm »
Touch hole liner time. This is one operation that always makes me nervous, no fixes for a goof-up here.

First I took the lock apart to have more room to measure the touch hole location.


Measure, measure and measure some more, the touch hole needs to be at what we call the sunset position in the pan.


Tap a pilot hole with a punch, you can move the punch mark around if it is off a little.


Pull the breech plug prior to drilling for the touch hole line


I drill with a small bit first and follow up with the right sized tap bit for a 1/4-32 tap.

 
« Last Edit: May 22, 2016, 06:25:24 pm by Eric Krewson »

Offline Eric Krewson

  • Member
  • Posts: 5,432
Re: Building another flintlock
« Reply #163 on: May 22, 2016, 06:32:08 pm »
Run a tap down the hole and slightly countersink the opening.


Screw the line in, in this case it protruded into the barrel too far so I pulled it out, cut a little off the end and reinstalled it.


Cut off the flange;


File off the excess flush with the barrel;


Looking good;


Just a tiny bit off center but OK overall;

« Last Edit: May 22, 2016, 06:42:22 pm by Eric Krewson »

Offline Eric Krewson

  • Member
  • Posts: 5,432
Re: Building another flintlock
« Reply #164 on: May 22, 2016, 06:46:01 pm »
Time to do some wood shaping, I will start by tapering the stock into the muzzle cap.